Crispy Kale Chips

Homemade crispy kale chips are a delicious, tasty treat consisting of very few ingredients.  One of the easiest recipes that pack a powerhouse of health benefits.

With fall foods showing up at the farmers markets, you may find an abundance of kale in your community, at the local farm or in your garden.  I planted kale early spring and it’s been flourishing through the seasons since.  With so much kale to enjoy from my own backyard, I have been enjoying it in salads, soups and alone- such as this tasty treat.

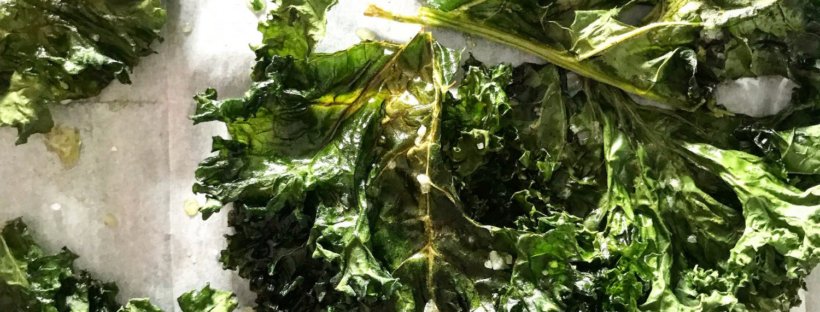
Kale chips can become soggy, so it’s recommended that you cook them on lower temps for a longer duration of time.  Once baked, they store well in an air tight container and typically last up to a week long.  Though I can never keep them that long because I LOVE them as a healthy snack.

Kale is one of the healthiest greens and a veggie loaded with antioxidants (which help remove unwanted toxins).  Kale contains calcium, a variety of vitamins and fiber.  Did you know that eating a cup of kale packs a punch of over 200% of your daily Vitamin A and 134% of Vitamin C?  Vitamins that help support the body, reduce inflammation and support the immune system as we head into the colder seasons.  Even more of a reason to enjoy this nutrient packed snack during the fall season.

With all of the health benefits, detoxification support and immune boosting benefits, this tasty treat is one I think may become a staple in your kitchen or pantry this fall and winter.


Crispy Kale Chips 


Ingredients:

1 large bunch kale

1 tablespoon coconut oil

Sea salt to taste


Directions: 

Preheat oven to 275 degrees F.

Wash and dry kale completely. Remove stalks and tear leaves into bite-sized pieces. Place the pieces of kale into a mixing bowl and lightly coat with coconut oil and sea salt (or seasoning). Spread on a baking sheet and bake for 10 minutes. Flip each leaf and bake for another 5-10 minutes or until edges are crisp.  Serve or store (once cooled) in an air tight container.

Note: I use garlic powder in place of salt but you can use any seasoning you desire.

Enjoy! ?

XOXO,

Kim

Simple Stuffed Zucchini Boats

I love summer cooking because there is such an abundance of produce, a variety of flavors and healthy ingredients that pair well to make simple meals.  This week, for “Farmer’s Market Friday” (on Facebook), I am spotlighting one of my favorites.  An ingredient grown every summer in my garden and found at many farmers markets…. zucchini.  There are several ingredients you can substitute like summer yellow squash, peppers and 8 Ball Zucchini.  Similar to my recipe seen in Frederick Lifestyle Magazine and  City Lifestyle Magazine  from last summer.  Recipe:  Stuffed 8-Ball Zucchini

If you’re looking for a super simple summer side to accompany your summer vegetarian dishes or pair with your gilled meat, this is another one of my “super simple summer favorites.”  Simple Skillet Zucchini and Squash. Have fun with the produce, get creative and see what you like best with these yummy summer goodies.

Zucchini packs a powerhouse of healthy nutrients.  It’s high in antioxidants, supports digestion and heart health, has shown to strengthen vision and has been linked to weight loss.  It may help reduce blood sugar, strengthen bones and support thyroid function.

Originally from Italy, this tasty ingredient is often found combining Italian flavors, sauces and cheeses.  Today I am sharing a healthier spin on this delicious dish.  This recipe can be modified in many ways to your liking and palate.

Simple Stuffed Zucchini Boats


ingredients:
  • 4 medium zucchini (my garden or The Jefferson Corn Stand)
  • 1/2 Tbsp avocado oil (or oil of choice)
  • 1/2 onion (The Jefferson Corn Stand
  • 2 garlic cloves, minced (can substitute powder garlic)
  • 2 tsp Italian seasoning (I use Tuscan Dipper from Olive and Basket)
  • 1/2 jar of organic sauce of choice
  • 1 lb bison or lean meat of choice
  • shredded cheese (I used goat)
  • salt and pepper to taste
  • Optional: Sometimes I add in fresh chopped peppers to this dish.  I also sometimes add in fresh chopped herbs in place of the dry seasoning.  Chopped fresh parsley can be added as a finishing garnish too.
  • Added nutrient option: Microgreens for a healthy topping (I use Maryland Microgreens)

NOTE: If you prefer non-meat options, you can substitute quinoa, chickpeas, beans, extra veggies and other cheese option. 

directions:
  1.  Preheat oven to 425 degrees.  Coat a large baking dish or cast iron pans with additional oil.
  2. Cut ends off of the zucchini and discard or compost.  Cutting lengthwise, carefully slice each zucchini in half.
  3. Using a small spoon or melon baller, carefully scoop out the seeds.  These can also be disposed of or saved to add back into the sauce.
  4. On the stovetop, heat a pan to medium heat and add the oil.  Add the onion and cook for 3-4 minutes.  Followed by the garlic.  Combine and cook for an additional 30-60 seconds while stirring to avoid browning.
  5. Add in the meat and seasonings.  Stir to combine.  Cook the meat mixture until brown and cooked through.
  6. Once the meat is fully cooked, add in the sauce and stir to combine.
  7. Reduce heat to low and simmer for at least 5 minutes.
  8. Carefully fill your prepared boats with the saucy meat mixture.  Top with shredded cheese.
  9. Bake boats for 25-30 minutes or until zucchini is tender and cheese has a golden brown.
  10. If desired, garnish with fresh chopped parsley and micro greens.
  11. Enjoy! ?

XOXO,

Kim